

Dave Jacobson
Ski Instructor Dave
PSIA Level II Certified
USSA Alpine Coach
USSA Alpine Official

Progressions
Progressions

Flatwork
Flatwork
Flatwork will help students learn to ski in less time. Use the time to connect to your students. Show them the athletic stance and have them feel where the pressure is on their feet, making sure it's not on the heels. Have them rotate their boot on a circle you make in the snow and explain that this movement will help create their first turn. Do one ski work and have them glide. Teach Herringbone and sidestep with one ski. When they have two skis on, find a very slight incline where they make their first glides, then wedges and wedge stop. This is the time to build up "little victories" Avoid having them do anything that is difficult, and therefore a failure in their mind. Build trust now and they will listen for the entire lesson...and return for more!

Wedge
Wedge
The wedge is the foundation of skiing and so is very important to do properly before moving forward. Have students do a small wedge and keep their body quiet without twisting or distorting. Hands and eyes are up, and ankles slightly closed to created forward pressure. Do this on very easy terrain and build from a gliding wedge to releasing the wedge to pick up speed and then going back into the wedge. Finally have them increase the size of the wedge if needed to come to a complete controlled stop. Once students can control the wedge and come to a stop, I feel it is safe to take them on the magic carpet. The first time on the carpet, I remove my skis and help students get onto and ride the carpet. I also give a wave to the operator on top to alert them of first timers heading his/her way.

Uphill Arc
Uphill Arc
Now, we're at the top of the bunny hill, and although small, to new skiers it looks intimidating. Reassuring them that you will keep them safe is important, and so take the time to explain how they will do a series of uphill arcs to move safely down the slope. Do a static demo of the task, and then demo the task for them so they see that by pressuring the downhill ski it will arc up the hill and stop them. Getting them turned around for the arc in the new direction usually takes a demonstration of the bull fighter stance. If possible I try to have them do the first arc near the top of bunny so they arc back to a flat area. Have them do arcs in both directions until they are near the bottom and are feeling comfortable with how the ski turns. when pressured

Wedge Turn
Wedge Turn
The next time up I like to go directly to a wedge turn. I explain that it is like the uphill arc but that rather than the downhill ski being pressured, the outside ski is pressured causing it to move faster than the inside ski and creating a full turn and not just an arc. It is important to do a great demo of the wedge turn in both directions. Assure them that the wedge itself will slow them and so will the curve of the turn, but they have to hold the pressure on the turning ski until past the fall line and across the slope. This turn is done with steering of the foot and lower leg. Remind them of the arc they followed in the snow during flatwork. This turn is done without bending out at the waist to apply the pressure, it is a steered turn. Do not let them sit back...keep their hips up and pressure on the tips.
Progressions
Progressions

Wedge Christie
Wedge Christie
I use this time in a lesson to demonstrate the traverse position. I feel it is of key importance and fits naturally just before going into Wedge Christies. The traverse position is demonstrated with skis facing across the slope with the uphill ski slightly ahead. I like to draw a line with my ski pole to point out the angle the tips create, and then explaining that the boots, hips, shoulder and hands are all kept at that angle. Once traversing I have students flatten the downhill ski by rolling the knee down the hills. This causes the downhill ski to slide down the hill and puts the uphill or new turning ski on edge. The turning ski wants to go faster and creates the turn. Once the turn is back in a new traverse I demo how the uphill ski is rotated to parallel. The Wedge Christie is normally a turning point in a lesson because it "just happens" so easily and is fun!

Parallel Turns
Parallel Turns
The Wedge Christie allows the student to feel how a flattened ski will slide sideways down the hill. Having felt how a Wedge Christie turn is initiated will help students be able to release edges and flatten both skis. I do garlands as an exercise at this point, having the students pressure the front of the skis to make the skis arc uphill. Then I have them release the edges and once again pressure the fronts. I do this in both directions and then have them pressure the fronts of the skis and release and roll the legs downhill to flatten the skis, but allowing the skis to float until directly down the fall line, when they once again engage the uphill edges as they go into a traverse in the opposite direction. I find skiers are usually able to do the parallel turns easily if the progression is followed as drafted. Now they have reached the ultimate in skiing...parallel turning.

Social Experience
Social Experience
Let's face it, social media plays a big part in our lives, and so sharing the fun your students had during the lesson needs to be captured at some point before the lesson ends. I often take the picture and forward it to the students or their parents, and sometimes they take pictures and forward them to me. In either case we share contact information, which starts a relationship that often leads to repeat lessons. I have a list of clients that have now become friends. I have helped nine students purchase new skis and other equipment as a service to them. It's very rewarding knowing that they enjoyed the lesson enough to want to become a skier! I also will shoot video of my students and have software on my phone that allows me to play it back in slow motion. It works on the hill, but really is a hit with parents who can't see the students progress from the lodge.

Lesson Review
Lesson Review
I use an extensive report system for all students, and like to complete them the following day so I remember clearly what went well, where work is needed, and what I want to do for future lessons. Parents appreciate the details involving their children, and it helps me prepare for upcoming lessons as well. I hope this insight into my progressions will help you prepare for your future lessons. This is just a brief snapshot, and ski instruction requires more knowledge and assessment tools. I have exercises that I use, but am not a huge fan of excessive exercises for beginner or early intermediate skiers, since they can be confusing to them, and often detract from learning the skill. And if you want to really do something unique. Take a fellow instructor out and teach a lesson without speaking a word. Better yet, blindfold them and verbally teach...
Teaching Tools for Ski Instructors
Teaching Tools for Ski Instructors

Ankle Closed
Ankle Closed
My examiner for Level I used the term "close your ankle" when she wanted us to pressure the front of our ski. I adopted the verbiage for my teaching and found it worked. Rather than using just words I built a tool made of white and red rubber that I bought at a fabric store. The little hinge pins were there too, and it took a few minutes to cut the shape and put the tool together. It's small enough to keep in my inside pocket of my uniform jacket.

Ankle Opened
Ankle Opened
While learning in a schoolroom setting may have created the thinking that kids learn in one of three ways auditory, visual, or kinesthetic, I believe learning to ski requires students to use all three all of the time. This is used as the visual tool used as I verbally explain the concept. You will find the words close or open your ankles will be quickly understood by your students as they begin to see the results of those actions.

Alignment
Alignment
Lower leg, upper leg/hips and upper body need to be positioned properly when skiing. I made this demonstration tool to be able to show the hinging points at the knee and the hips, and find that the the ability to easily shift the positions of those body parts strikes a nerve with students. Again, purchase some black rubber at a fabric or hobby store, find hinges to allow movement and stick it in your coat with the boot demo tool

Center of Mass
Center of Mass
I use both of these teaching tools during the flat work for beginner lessons and bring them out as needed during all lessons. I find the flexing demo tool allows me to visually show how the lower leg and upper body should be kept in alignment. I also find that it is easier to explain the concept of being in the backseat, and why having hips up is necessary to stay forward on skis.
Teaching Tools for Ski Instructors
Teaching Tools for Ski Instructors

Mini Skis
Mini Skis
I find that carrying a pair of mini skis in my pocket allows me to explain the position of skis whether when introducing the wedge; teaching wedge turns; explaining the flattening of the ski in wedge christie's or flattening both skis when initiating a parallel turn. I found these on eBay for $4.00, and then added my personal touch as a fan of Head skis. They are soft plastic so safe to carry in a jacket pocket.

Handlebars
Handlebars
Dollar stores call them toy nunchucks and I call them handlebars. They come with red or green handles, so buy one of each and switch them out. Now you have a tool to not only help kids keep their hands up, you have an alternative to right turn/left turn, and can simply say turn red/turn green. They can also be used to begin teaching separation of upper and lower body, or for just having fun when making wedge turns.
Teaching Pole Touches
Teaching Pole Touches
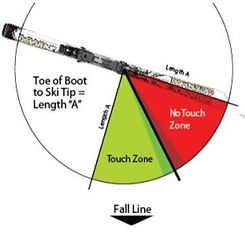
Using the advice provided in the diagram, I start teaching pole touches by using my ski pole to scratch a half circle from the tips to tails of my skis. Then I go out from my ski boot and scratch a line from the arch to my boot. Finally, like cutting a pie, I create one more scratch to cut the front quarter piece in half. The red area shown above is the no touch zone, and the green area the touch zone.

Free Slow Motion App
Free Slow Motion App
If you don't have a slow motion app on your phone go to the play store and install one for this season. Having the ability to show students skiing in slow motion allows you to better see their movements making analysis easier. Slow motion also helps the students understand their movements, and can be a valuable tool when talking to parents during the wrap up after the lesson. Plus it fun!
The New PSIA Standards
(click star to view)
The New PSIA Standards
(click star to view)
The PSIA has not modified their standards since 2014. This year, the new standards for certification have been modified and published. Anyone seeking certification should download and read this document.
Explanation of Exams by PSIA
(click star to view)
Explanation of Exams by PSIA
(click star to view)
The PSIA is working hard to standardize the exam process between all Regions of PSIA. This document gives and overview of the various regions and how they they handle the certification exams.
The Learning Connection
(Click star to view)
The Learning Connection
(Click star to view)
This is a new document created by PSIA this season, and so every instructor should take a look. You will notice that People Skills has been added to the Learning Connection.

Level I Certification
Level I Certification
Level I certification begins with flat work, and goes into wedge, wedge turns and linked wedge turns. You'll ski with an examiner day one and they will tell you exactly what they want you to do during testing the following day. Listen, interact, have fun and enjoy the experience. Study the PSIA manuals and pay a great deal of attention to the Five Fundamentals of Skiing! This year people skills will be examined so be outgoing; have fun; ask questions; be enthusiastic and you'll get the bronze pin. Remember, getting a pin can be done with minimal effort, but to be a great ski instructor, I encourage you to study, clinic and do whatever you can to really begin to understand the core concepts of skiing and how they fit into your teaching progressions.
Level II Certification
Level II Certification
The exam is two days with the first day being spent skiing with the examiners. Listen closely and they will explain what is required for the testing day. Level two requires video analysis of one skier and you'll sit with the two examiners and explain what you see and what you would do for the student. After the video analysis the teaching session begins, and you'll teach a lesson to the group. The skiing session requires doing wedge christies, basic parallel turns, pivot slips, moguls (if available), free runs, railroad tracks, one-ski turns, medium radius turns and some off piste skiing. You'll need to fully understand the five fundamentals of skiing, the core concepts, and be able to show that you can blend the core concepts in your skiing. This year people skills are being added to the technical skills and teaching skills, but if you already are a great instructor; have a strong personality and just enjoy being out on skis...you'll do fine with people skills.

Links to Documents to Prepare for PSIA-Central Exams
Links to Documents to Prepare for PSIA-Central Exams

Dave Jacobson Level II Exam Video (click)
Dave Jacobson Level II Exam Video (click)
Those interested in getting Level II Certification can watch this video created as part of my Level II Certification in 2021. All tasks required are shown.